MP 2: Level Design
Due:
Part 1: Feb 19 11:59PM CT
Part 2: Feb 28 11:59PM CT
Important Notes
Read the submission instructions carefully!
Table of Contents
- MP 2: Level Design
- Part 1: Player Character, Health System, Collectibles, and Pursuer Enemy (Due Feb. 19)
- Tutorial to help get you started on the Pursuer enemy type:
- Step 1: Create the AI Controller
- Step 2: Create the AI Character
- Step 3: Add Pawn Sensing
- Step 4: Add random movement to the AI Character
- Step 5: Add the Nav Mesh
- Step 6: Create a Chase Player Event
- (OPTIONAL) Step 7: Add Enemy Functionality Upon Chase Event
- (OPTIONAL) Step 8: Apply Damage
- Step 9: Create an Enumerator Class
- Additional Resources
- Part 2: Mortar Enemy, Custom Enemy, Player-Enemy Collisions, Completing the Level (Due Feb. 28)
- Additional Submission Instructions

MP 2: Level Design
MP2 is all about level design and all the important factors that go into it. In this MP we will touch on player abilities, level layouts, and enemy AI. The objective of this assignment is to allow students to design and create their own 3D platformer level. You will be provided with a player character, and you will need to place assets, add mechanics, and create enemies for the player character to interact with.
This MP is split into two parts:
Part 1 covers creating the map, health system, collectibles, and Pursuer enemy type.
It is due Feb 19 at 11:59pm. It is worth 10% of the total MP grade and is only graded for completion…there is no partial credit. If you do not submit on time and with all the required features working, you total MP will at most be 90% of the total points obtainable.
Part 2 covers creating the Mortar and custom enemies, as well as handling player-enemy collisions and putting the level all together.
It is due Feb 28 at 11:59pm. It will be graded according to the MP rubric with partial credit.
Please pay close attention to the guidelines about recording the video for submission:
Video Guidelines Link
If you do not follow the guidelines and your submission is hard to grade you may lose points.
To start, you should get familiar with the basics of how the level editor works in Unreal. We recommend you complete the tutorial found here: Tutorial Link. Once you have familiarized yourself with the level editor in Unreal, you may continue onto the main assignment.
Please read through the entire assignment spec before starting to get a better understanding of all the requirements.
Part 1: Player Character, Health System, Collectibles, and Pursuer Enemy (Due Feb. 19)
Step 1: Setup the Map and Player Character
To start, import the Unreal Learning Kit into your Unreal Engine. You will find that the basic player controller along with a large number of assets you may want to use are already included and preset in the kit. Construct a new platform level. Leave the map relatively blank for now, as you will gradually add components later on.
You may notice that the Unreal Learning Kit states it only is supported by Engine Versions 4.26 - 4.27, 5.0 - 5.1. However, this content can be used with Unreal Engine 5.4. After downloading the kit, it will ask you to create a new project where you can select Engine Version 5.1. When you attempt to run the project with an updated engine you may receive a notification about making a copy of the project as the newest engine may have compatibility issues, but you can just open without making a copy. On Windows, I received two notifications about missing project settings (Shader Model 6). You can enable these by navigating to the Project Settings (Edit -> Project Settings) and checking the corresponding box under ‘Platforms - Windows’. If images are helpful, they can be viewed here.
The character controller you will be using is under BP_LearningKit_PlayerCharacter.
Step 2: Add a Health System
The Health System for this MP should be very similar to the one you created in the MP1.
Your Health System should include:
- a Health Bar displayed somewhere on the screen
- a Game Over screen when the player’s health reaches 0
- health packs scattered around the level that upon collection will be destroyed and increase the player’s health
Step 3: Create Collectible Items
Next, you will need to place floating collectible items across the map to guide the player and encourage them to explore. To represent being collected, the collectibles should be destroyed when the player collides with them. You should add a Score system to your game, so that upon collection of a collectible, the player’s score increases. The Unreal Learning Kit includes several assets that could work well as a collectible but feel free to also upload or create your own asset.
Step 4: Create a Pursuer enemy
The Pursuer should:
- Follow a patrol path between random locations around the starting point
- Run at the player when the player is at a moderate distance within the line of sight of the Purser
- Return to its patrol path if the player gets too far away (this should be done by the enemy moving, not teleportation)
Tutorial to help get you started on the Pursuer enemy type:
NOTE: This tutorial covers the basics for implementing the Pursuer starting from the UnrealLearningKit starter project. It does not cover all the requirements for the chaser. Use intuition, creativity, and other online tutorials to aid in completing all the requirements! You are also able to use behavior trees when implementing your Pursuer. More information on behavior trees can be found under this tutorial.
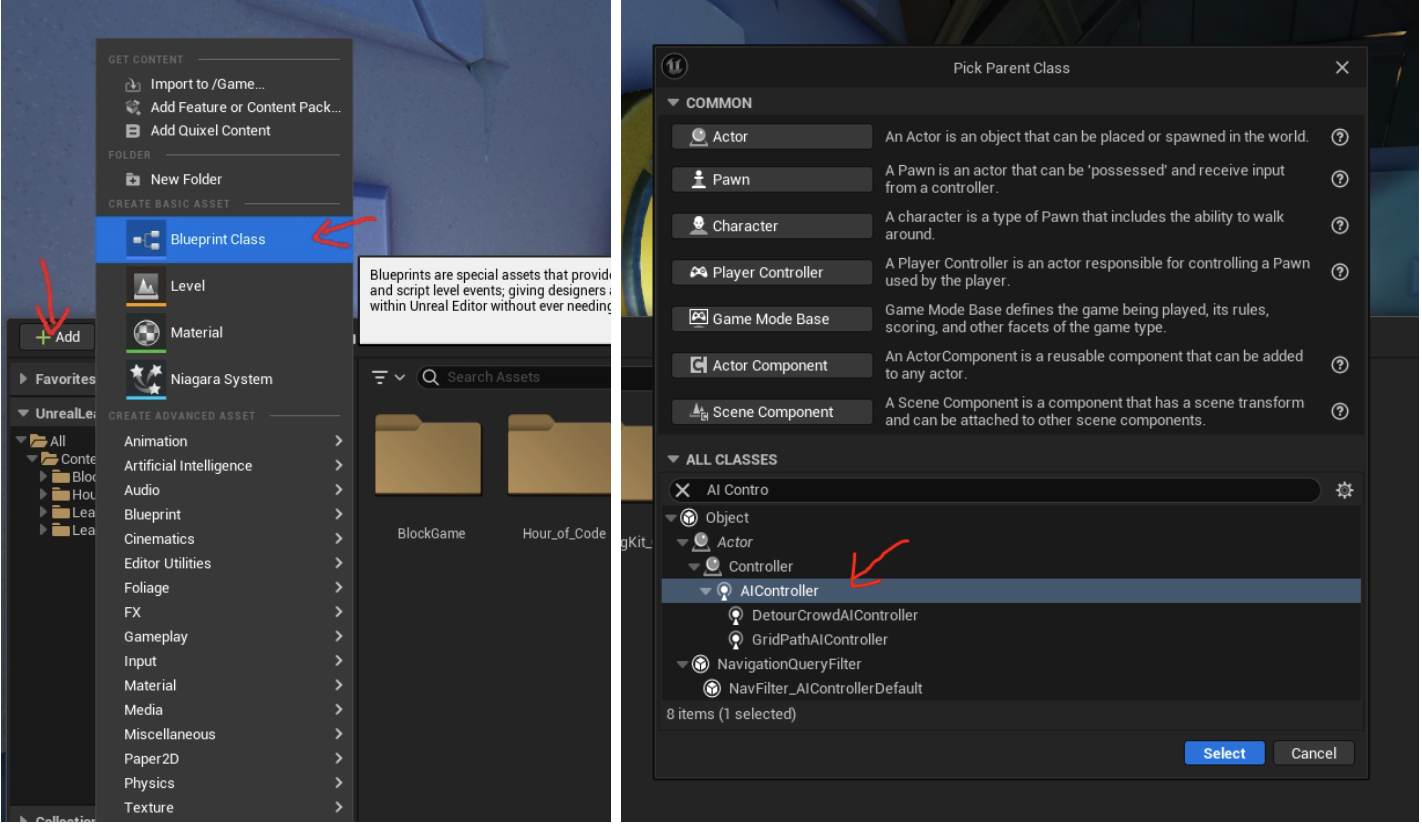
Step 1: Create the AI Controller
Unlike the player character that is controlled by an input device (i.e. keyboard and mouse, Xbox controller, etc.), the Pursuer will be controlled by an ‘AI controller’. This allows us to specify in code how we wish the Pursuer to behave. To do this, we will create an ‘AI Controller’ object to control the actions of the Pursuer enemy.
In the Content Drawer (Bottom left), click Add > Blueprint Class > (type into “All Classes”) > AIController and save the controller with the name ‘Pursuer_AIController’.
Step 2: Create the AI Character
Both the player characters and the AI character use the ‘Character’ blueprint. As explained above, the main difference is that it will be controlled by the ‘AI Controller’. This ‘Character’ blueprint will connect the model geometry, animations, code for the behaviors, senses, and more.
In the Content Drawer, go to Add > Blueprint Class > Character and save the AI character with the name ‘BP_Pursuer’. Open its blueprint editor. Inside the “Components” panel (top left), select the “Mesh” component. For starters, set the following properties in the Details panel (right):
- Skeletal Mesh: SK_EpicCharacter
- Anim Class: EpicCharacter_AnimBP_C
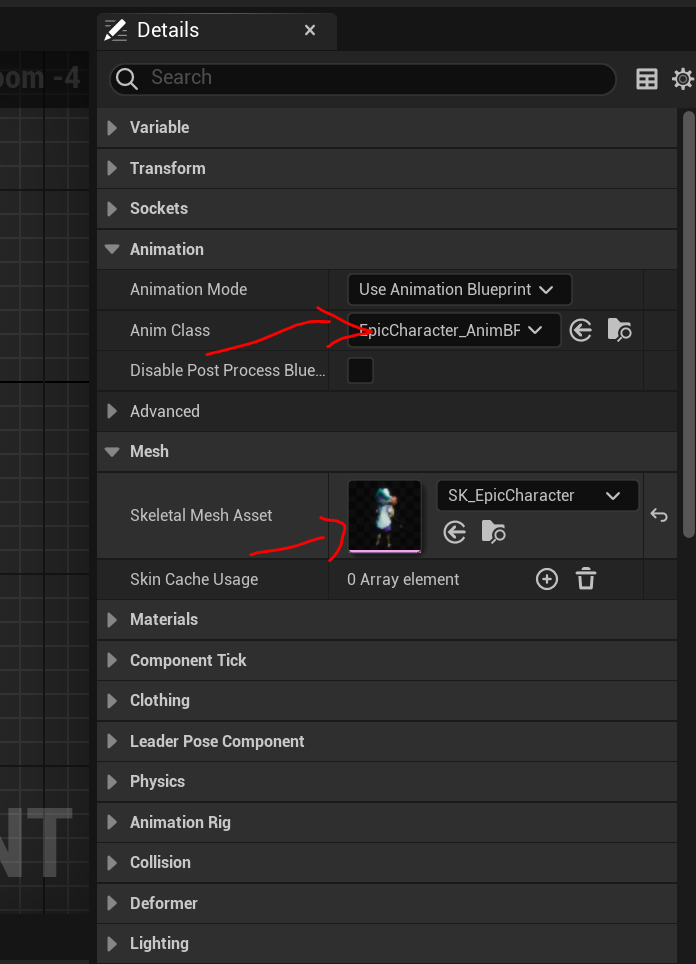
This can be changed later to whatever mesh/animations you like later!
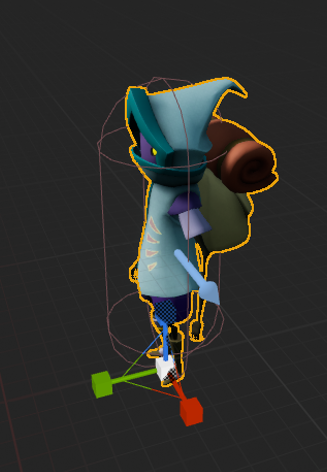
Add a “CapsuleComponent” in the Components panel (top left). By default, the mesh will not be inside of the capsule. Adjust the Z position and scale of the character mesh so that it fits right within the borders of the capsule. This can be done using the arrow gizmos (the 3 red, blue, and green perpendicular arrows) or adjusting the transform values in the details panel (right) to roughly -80 for Z position and 0.85 for scale.
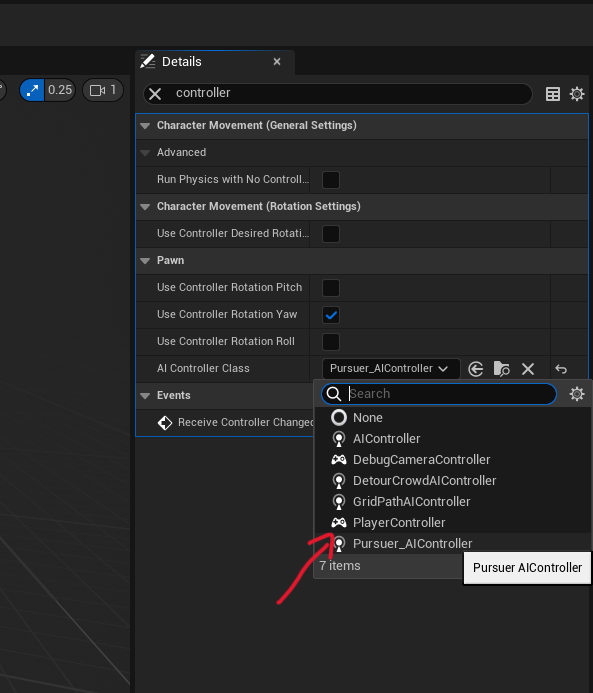
Finally, select “AICharacter (self)” on the Components panel (left), then in the Details panel (right) set its “AI Controller Class” to the AI controller (‘Pursuer_AIController’) you created in step 1.
Step 3: Add Pawn Sensing
For the Pursuer to start chasing the player when it is nearby, we will add Pawn Sensing to the enemy so that it can sense the location of the player.
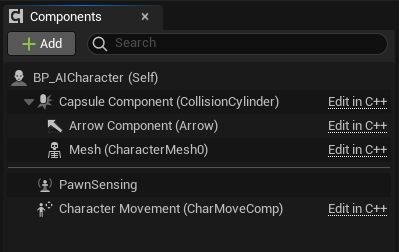
Remaining in the ‘BP_Pursuer’ blueprint, select Add > PawnSensing in the Components tab on the top left. See below for how the component hierarchy should look in ‘BP_Pursuer’ after this step.
Step 4: Add random movement to the AI Character
Now we will add the code into our Pursuers blueprint to move. This will create the behavior of continuously roaming the map.
In the Event Graph of ‘BP_Pursuer’, add a custom event titled ‘Roam’ and use the “AI MoveTo” method to move the character to a random location.
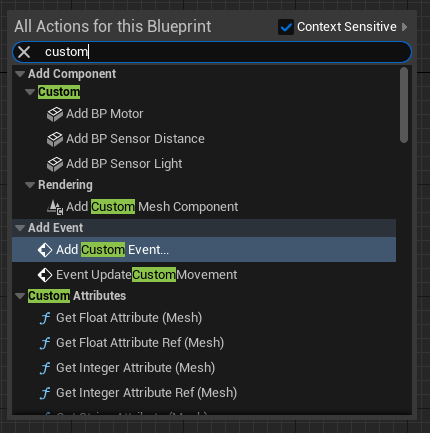
To create a custom event, right-click on the event graph, search and select “Add Custom Event” in the pop-up tab and name the event “Roam”. This custom event will be called within the BP_Pursuer event graph whenever we want the Pursuer to roam.
Add an “AI MoveTo” block to the event and use the method “GetRandomReachablePointInRadius” to set the destination.
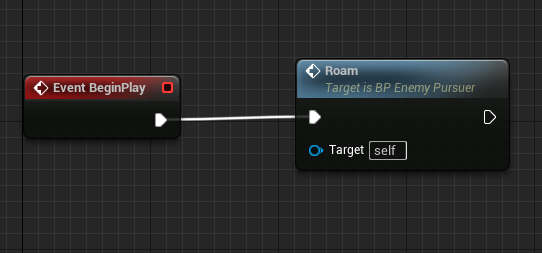
Since we want the AI Character to keep roaming, add a slight delay after the custom method and call Roam again to create a loop. Here is how the event graph should look:

Call the custom Roam event from Event BeginPlay.
Step 5: Add the Nav Mesh
The pursuer needs to know what places in the level it can and cannot walk on. To do this, we define the area our AI Character can roam in by adding a navigation mesh bounds volume to the level.
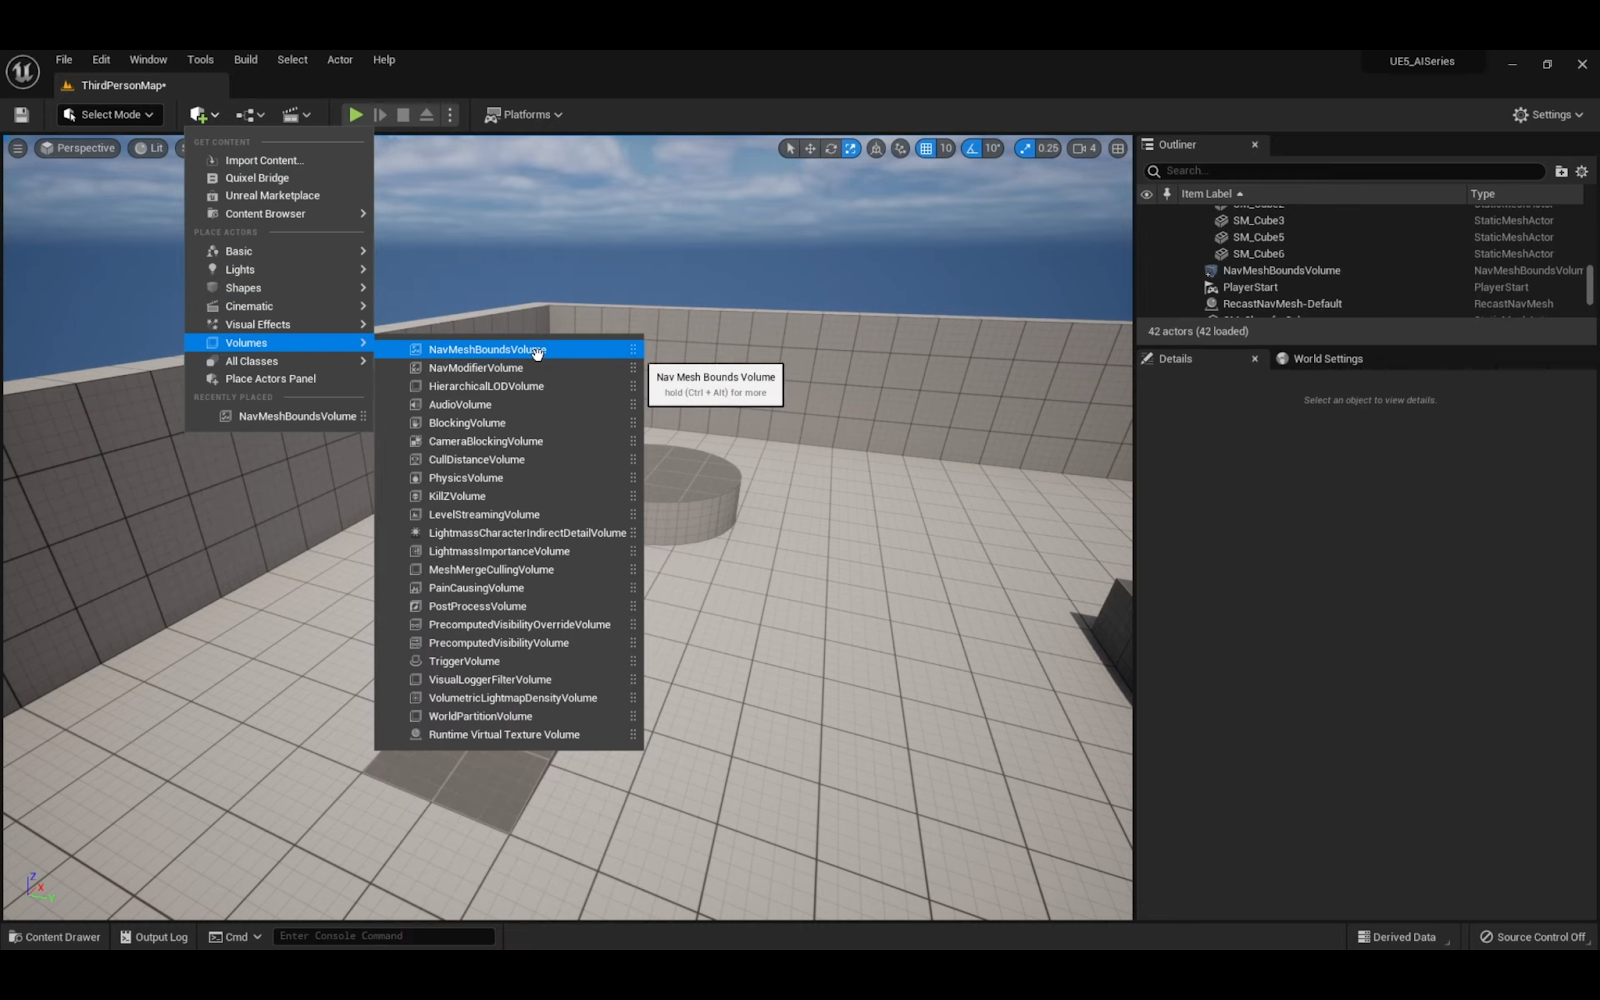
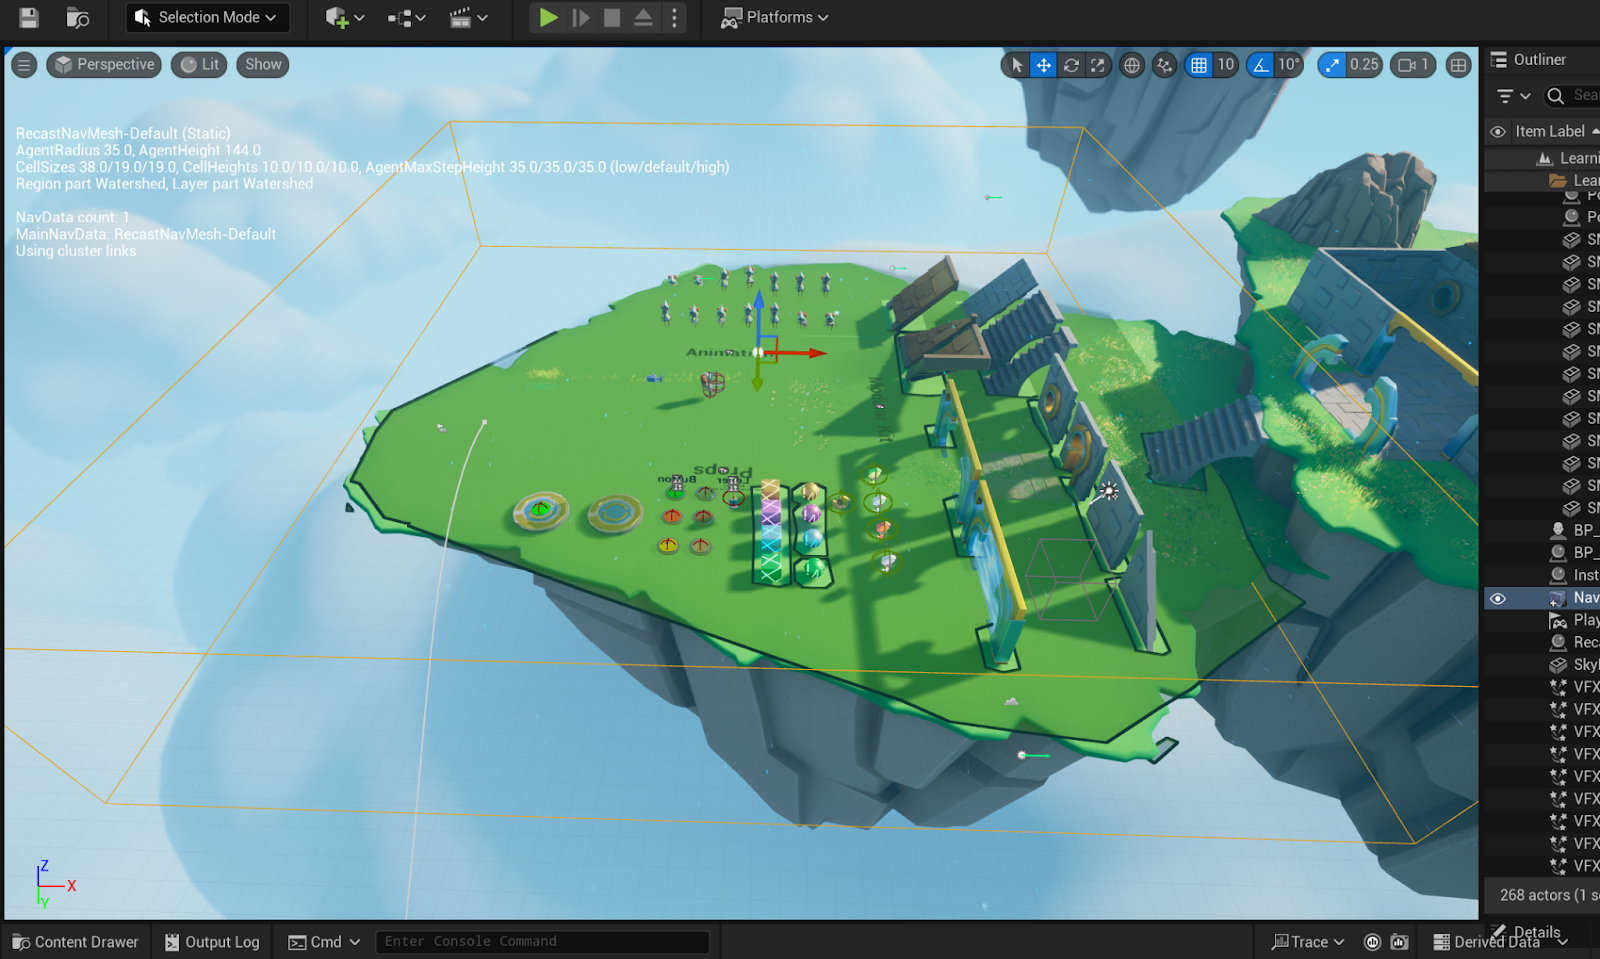
Return to the level map window. From the Content Drawer, drag and drop ‘BP_Pursuer’ into the level map. Then, navigate to the + icon on the top left and select Volumes > NavMeshBoundsVolume.
A Nav Mesh indicates the area where AIs can be activated, so make sure the Nav Mesh is large enough to encapsulate the area you want the enemies to move around in. To visualize the navigable area inside of the NavMeshBoundsVolume, press “P” on your keyboard. This will highlight all surfaces that the AI character can be navigated to in green.
Step 6: Create a Chase Player Event
We will use the same logic from “Roam” to initiate a “Chase Player” event.
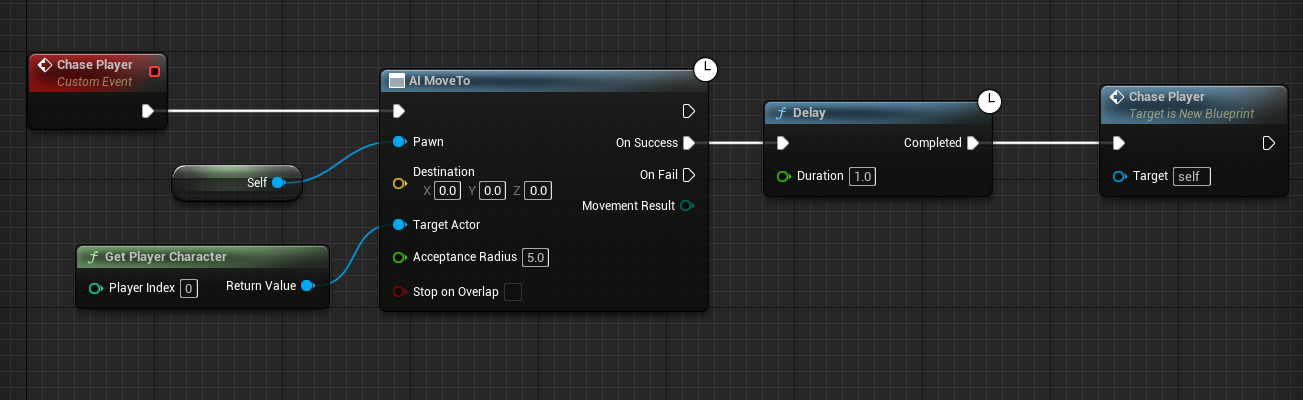
Create a new custom event titled “Chase Player”.
From the Chase Player event, add an “AI MoveTo” block and set the Target Actor to the Player Character. Like in the Roam event, add a “Delay” block from “On Success” and call “Chase Player” again after the delay has completed.
To test, replace “Roam” in “Event Begin Play” with “Chase Player”, compile the file, and run the game.
(OPTIONAL) Step 7: Add Enemy Functionality Upon Chase Event
We will show you how to cause the enemy to blow up with a sound and particle effect upon collision with the player character.
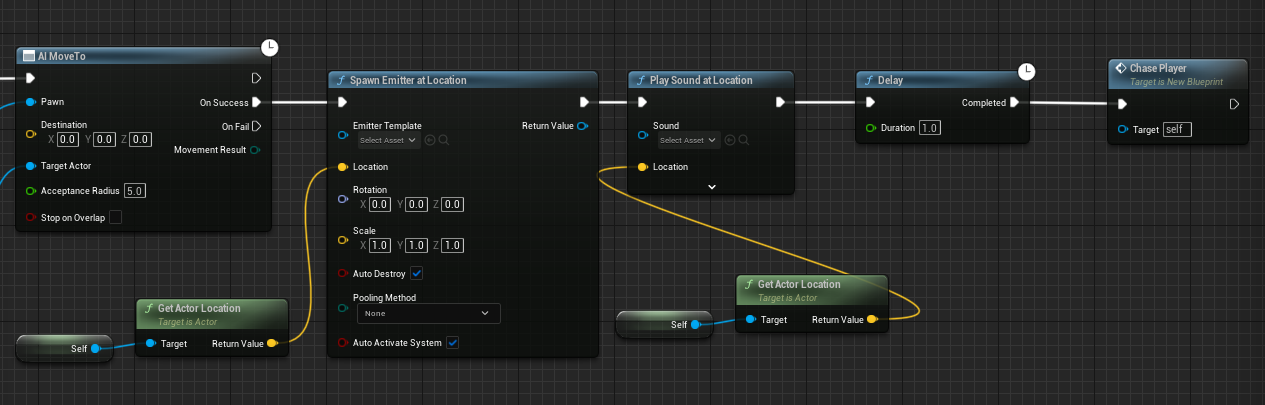
Break the link between “AI MoveTo” and “Delay”. Insert a “Spawn Emitter at Location” block on success of the “AI MoveTo”. Next, connect a “Play Sound at Location” block and a “Destroy Actor” block.
Connect “Get Actor Location” to the “Location” node for both “Spawn Emitter at Location” and “Play Sound at Location”.
You will need to add particle effects and sounds to your project. Select your desired particle effect asset in the dropdown menu under “Emitter Template” on the “Spawn Emitter at Location” block. Select your desired sound asset under “Sound” on the “Play Sound at Location” block.
(OPTIONAL) Step 8: Apply Damage
Insert an “Apply Damage” block between the “AI MoveTo” and “Spawn Emitter at Location” blocks.
Set the “Damaged Actor” node to “Get Player Character”. Play around with the different damage parameters to get your desired effect.

Check out this tutorial on how to use the damage system/events
Step 9: Create an Enumerator Class
We can create an enumerator class to help us control the behaviors of our AI Character.
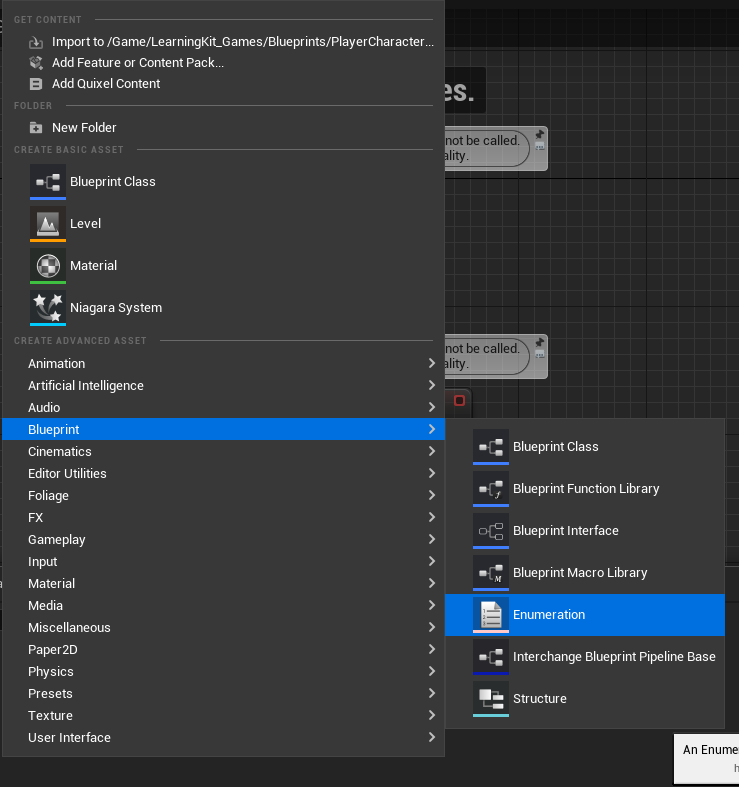
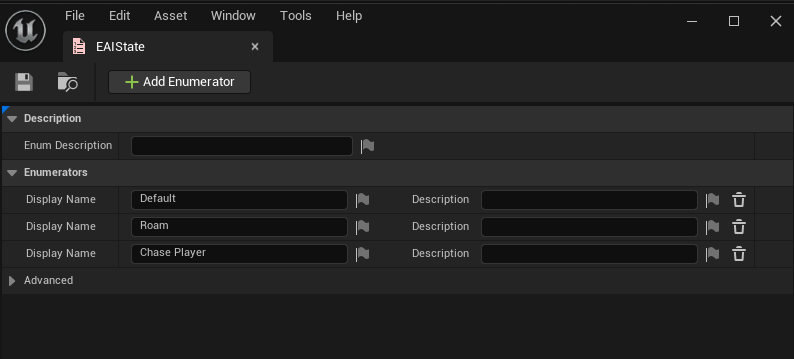
In the Content Drawer, within the AI folder, create a Blueprint Enumeration class. This class will define what state our AI is in (ChasePlayer or Roam). Name this class “EAIState”.
Add three enumerators: ‘Default’, ‘Roam’, and ‘Chase Player’.
In the AICharacter class, create a variable called “AIState” of type “EAIState”. Make the variable public by clicking on the eye icon on the right.

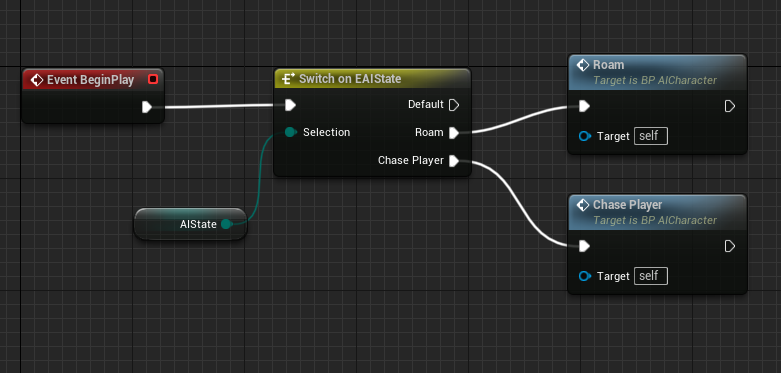
Remove the connection between “Event BeginPlay” and “ChasePlayer”. Drag from “Event BeginPlay” and type “Switch on EAIState”. The AIState variable will be connected to the “Selection” node on “Switch on EAIState”.
Attach a ‘Roam’ event block to the ‘Roam’ node and a ‘Chase Player’ block to ‘Chase Player’.
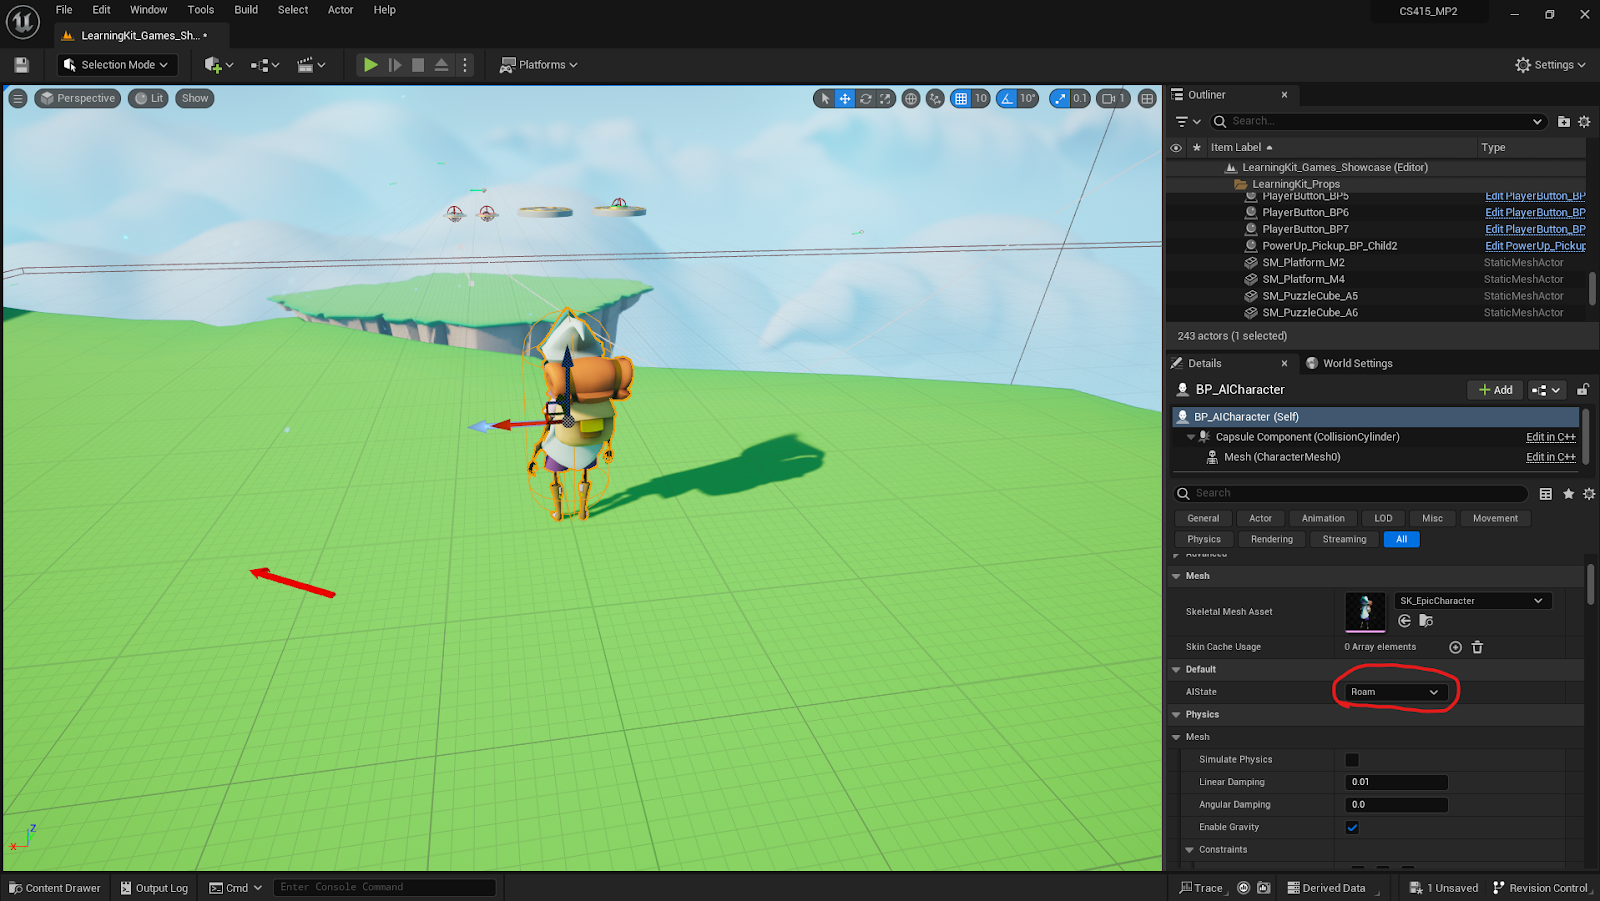
In the viewport, click on your AI Character and specify the default “AIState” as ‘Roam’. Default states are unique to each character, so you can create multiple AI characters, some with the default set to Roam and some with the default set to Chase Player.
Note on Behavior Trees
Alternatively, students may implement the AI Character using Behavior Trees in Unreal. There are many resources available online for how to use Behavior Trees. And here are a few slides on Using AI in Unreal. However, this feature is more high-level and may be tougher to debug, so if you feel more comfortable working with blueprints, we recommend simply calling the Roam and Chase events from within the Pursuer blueprint.
Additional Resources
In addition to the instructions above, the following set of tutorials may be helpful to you:
- Unreal Engine 4 - AI Roam
- Unreal Engine 4 - AI Chase Player
- Create A Platformer Pt 4: Chasing Knockback Enemy! UE4 Tutorial
- Unreal Engine 5 Tutorial - AI Part 1: Character Setup
- Using AI in Unreal
End of Pursuer tutorial.
Part 2: Mortar Enemy, Custom Enemy, Player-Enemy Collisions, Completing the Level (Due Feb. 28)
Step 1: Create a Mortar enemy
The Mortar should:
- Be an unmoving enemy placed on the ground
- Randomly launch projectiles above and around it in an arc affected by gravity
- The projectiles should cause a small explosion on collision with other objects
- The explosions should knock back and reduce the player’s health on collision (the explosion does not need to have any other effect…e.g. it does not affect the terrain)
Step 2: Create your own enemy
Create an enemy of your own design. It should have a similar complexity to the other two enemies and also be distinct and take on a different role. Please discuss your design in your design document.
You can use any assets you want for the enemies and their projectiles. Simple shapes will do as long as each enemy is visually distinct.
Designs to avoid:
- Combine pursuer and mortar as a new enemy type
- Duplicate pursuer/mortar with a different property (smaller hitbox, higher velocity, etc.)
- Duplicate pursuer/mortar with a different visual representation (e.g import 3d model from Sketchfab) without adding more mechanics If you are concerned, feel free to make a CampusWire post of your thoughts
Step 3: Add Player-Enemy collision behaviors
All three enemy types should display the same behaviors upon colliding with the player character.
There will be two different types of collision behaviors:
- Collision with the enemy’s “head” (or the top of whichever model you decide to use)
- Destroy the enemy
- Collision with any other part of the enemy
- Reduce the player’s health
- Knock the player back a small but noticeable distance
- Remove player control for a short duration of time
Step 4: Putting It All Together
The last step of the MP is to put it all together and make a platforming level. Your level should present some degree of challenge for the player and take around 5 to 10 minutes to complete.
Your final level should:
- Have a complete level with creative and thoughtful designs (not just duplicating assets around the scene)
- Have health packs scattered around the level that increase the player’s health when collected
- Have floating collectibles scattered around the level that are destroyed when collected and increase the player’s score
- Integrate all three enemy types into the design of the level
- Display a Game Over screen when the player’s health is reduced to 0 or the character falls off the map
- Display a Level Complete screen when the player reaches the end of the level
- Allow the player to restart the level after a win/loss, which returns the player to the starting location and resets all the level’s components
As far as environmental and visual assets go, you may use any of the provided, built-in, or any other assets in your level creation. Feel free to work in the provided project or in your own new project. The level layout, enemies, and collectibles portions of the rubric are all a part of the level design. Your level should be somewhat challenging, the player should have to interact with enemies, and there should be some exploring required to find the collectibles. If any of these things aren’t the case, you’ll lose significant points from those portions of the rubric. Make sure that your level isn’t just the tutorial level!
Hints for Common Bugs
- If the projectile is going through instead of colliding with the ground, replace
DefaultSceneRootwith your Projectile’s Mesh by dragging, this allows you to handle more events for the projectile actor as an unit, and make sure it is set toBlockAllDynamicin Details panel - If you are having trouble setting up collisions with static meshes, check out this tutorial (Please make a backup before modifying to avoid unexpected mesh behaviors caused by collision setting that is hard to restore!)
- If you are having trouble with character knockback, check out this thread
- If you are having trouble with importing your own character and animations into UE5, check out this tutorial
Additional Submission Instructions
For Part 1
Just submit a demo video and link to repo/ drive folder containing your code.
For Part 2
Submit a demo video and link to repo/ drive folder containing your code.
In addition, you should also submit a short written document, either pdf or docx format, explaining your process for designing your level. It should be at most a page long. It should explain how you went about the level design process and how your level design had to accommodate the new mechanic and enemy you created. For example, you could talk about why you placed your custom enemy or collectibles in certain parts of the level. Please also record your video according to this guideline.
Submission Instructions
Hand-in will be done on Canvas. You will be expected to upload the following:
- A link to a git repo or drive/box folder containing your project code. It should be possible to build your game in Unreal using the submitted code.
- A short video up to 10 minutes long (can be much shorter) showing your game and demonstrating all the required features. Your video ideally should be a screen capture with brief narration by you pointing out the features as they appear in the game.
Some good options for video capture software are:
If recording narration is problematic (e.g. you lack a microphone) you can skip that part. Please only resort to capturing video using your phone if you have tried one of the above methods and just could not get it to work.
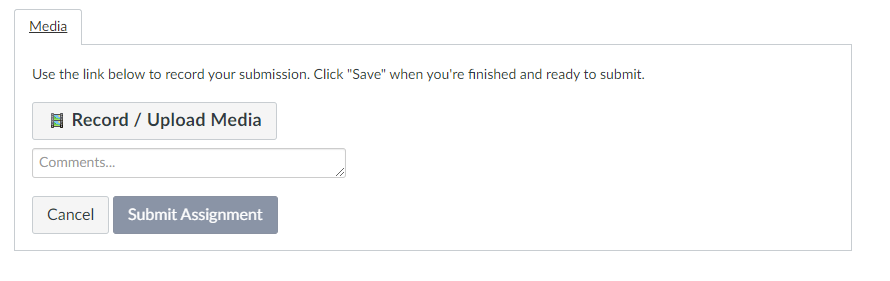
On Canvas you should put the link to your code in the Comment box and then upload a video file using the Upload Media tab.
| Name | Points | Description |
|---|---|---|
| Health System | 10 | Display and track a player's health metric |
| Implement the Pursuer Enemy | 10 | Implement the Pursuer enemy described in the MP spec |
| Implement the Mortar Enemy | 15 | Implement the Mortar enemy described in the MP spec |
| Create New Enemy Type | 15 | Design and implement another enemy type of your design |
| Level Layout | 10 | Create a level layout that can be traversed in 5 minutes and has a level complete screen |
| Enemies | 10 | Strategically place all enemy types throughout the level |
| Collectibles | 10 | Place collectible objects around the level |
| Design Document | 15 | Submit a document that explains your level design and design decisions |
| Video | 5 | Submit a link to a video demo of your game |
| Total | 100 |